re-sizing:

to re-size the image i went to 'edit', then clicked 'transform' which lead me to the scale button. this allowed me to make the image i was inputting into the picture, smaller or bigger to fir the size of the original painting.
Adjusting color - hue saturation:

to adjust the hue (changing hoew intense the colours of the pictures are) i went to adjustments and clicked hue saturation. i had to slide an arrow up and down a bar to decide whether i wanted really vibrant colors in the paining or whether i wanted dull colours.
using selection tools:

the selection tools are, the magic wand tool, the lasso tool and the magnetic lasso tool. i mostly used the magic want tool because i was easier to select pixels and made it quicker to get my work done. occasionally all the pixels would select as one so i used the lasso tool which is free hand. to select around an image and get a perfect line around it, i used the magnetic lasso tool.all these tool i found located in the tool bar to the left.
using brushes:

i used the paining brush and the art history brush as well as as the smudge tool. i changed the color of the fruit to make it resemble the original paining. i used the art history tool to make the surface of the fruit look painted with brush marks. and the smudge tool, i used to make the the paint spread over the image and thin out the paint in area's
re-constructing the painting using layers:

i used layers to separate every piece of work i did on the painting. every time i added in an image or edited on an interred image i created a new layer just in case i made a mistake, then i could go back and delete that layer if i wanted to.
cropping the image

i cropped the image because the paining was too large and i use wanted to focus on the detail of one area. i went to the toolbar and selected the crop button the pulled in the sides to the area i wanted.
My overall work!

the over all piece i don't believe looks like the original picture however the detail of the images in the paining i believe do fit in with the original piece of work, i just don't believe they clash together as one piece of work.
USING ADOBE ILLUSTRATOR


using the pen tool, the shape tool and the ..... tool i have created a square, circle, triangle, hexagon and a star. i have also used the fill tool to chose the colors of the shape and outline.
USING THE PEN TOOL...

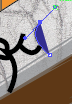
using the pen tool i have managed to create this duck.to make a line i had to simply click from one point to another. to make the lines more curvy i had to click one point, then click another but move the mouse left or right to create the curve.

this is how i have created a curve in the duck picture using the pen tool. i have drawn a point to point line then clicked left or right to get a bend in the line.
USING THE SHAPE TOOL...
there are many shapes i could use for my painting but in this example i have chosen to use the rectangle tool.

To change the color of rectangle i used the swatches palate and selected the correct matching green colour.

SELECTION TOOLS...
this is the selection tool, which can pick up shapes drawn by the pen tool or shape tool and allow you to move then to different places on the page


USING LAYERS...

by using layers, it made it easier for me draw onto the page. if i made a mistake or just wanted to see what one style of drawing onto it looked like on my picture i could use many layers to see experiment this. i had 4 layers, one with my original drawing then using another i outlined my drawing and then used shapes to cover it as well as using color. my last one was for the detail on the bricks, i wanted to see if the technique i used to make them looked right, if they didn't i could delete that layer and start again.
USING ADOBE ILLUSTRATOR
EXPLORING SHAPES…
using the pen tool, i have managed to create free hand shapes. i also added a thick outline to some shapes and using the fill tool, colored in most of the shapes and outlines.
using the pen tool, the shape tool and the ..... tool i have created a square, circle, triangle, hexagon and a star. i have also used the fill tool to chose the colors of the shape and outline.
USING THE PEN TOOL...
using the pen tool i have managed to create this duck.to make a line i had to simply click from one point to another. to make the lines more curvy i had to click one point, then click another but move the mouse left or right to create the curve.
this is how i have created a curve in the duck picture using the pen tool. i have drawn a point to point line then clicked left or right to get a bend in the line.
USING THE SHAPE TOOL...
there are many shapes i could use for my painting but in this example i have chosen to use the rectangle tool.
this is the box where the shape tools are and i have selected the rectangle tool.
here i have drawn over where i want the rectangle to be placed. i used the color white so i could see clearly where i was placing the rectangle.
 |
SELECTION TOOLS...
this is the selection tool, which can pick up shapes drawn by the pen tool or shape tool and allow you to move then to different places on the page
This is the direct selection tool which allows you to move shapes around the page just like the selection tool but also it allows you to move around corners of the shape to change its form if you didn't get the shape right.
by using layers, it made it easier for me draw onto the page. if i made a mistake or just wanted to see what one style of drawing onto it looked like on my picture i could use many layers to see experiment this. i had 4 layers, one with my original drawing then using another i outlined my drawing and then used shapes to cover it as well as using color. my last one was for the detail on the bricks, i wanted to see if the technique i used to make them looked right, if they didn't i could delete that layer and start again.
No comments:
Post a Comment